Showing posts with label baking recipe. Show all posts

Wednesday, 5 June 2013

Loving Crepes

French crepes are actually something that was celebrated every 2nd of February. It was a day where every French home would make a good dozen of lovely crepes to eat together. It was believed to be for the return of the light (spring is coming and no more long winter nights ahead) and it is called "La Chandeleur". The crepes were the pride of the Britanny region (Bretagne) in the North West of France, where they make the recipe extremely big and paper thin. They usually eat them with a bit of caster sugar spread on the top. It was then rolled in a big "cigar" or folded in four and eaten while drinking some bubbly apple cider of the same region. Savored for centuries, crêpes are celebrating a revival today, with crêperies opening throughout France, North America, and Asia.

Most cuisines all over the world make crêpes in one form or another. There is the Italian crespella, the French crêpe, the Chinese mandarin pancake, the Mexican tortilla, the Indian dosa and the Russian blinchki. In France, the crêpe used to be called pannequet, from which the word pancake is probably derived. A very thin pannequet resembles the wrinkled, fragile looking fabric, which we know as crêpe—hence its name.

The word 'crêpe' is French for pancake. A crêpe is an unleavened, flat, thin pancake of cooked dough or batter, which is used as a wrapper for another food. Crêpe batter is generally made from flour, eggs, milk, butter, salt, sugar, water and oil. Until recently, crêpes were cooked on large cast-iron hot plates heated over a wood fire in a fireplace. The hot plates are now gas or electric heated, and the batter is spread with a wooden spreader and flipped with a wooden spatula.

Ingredients

1/2 cup whole wheat flour
1/2 cup all purpose flour
1 teaspoon granulated sugar (optional)
1/4 teaspoon salt
3 eggs
1/2 cup milk
2 teaspoons butter, melted
1/2 cup seltzer water or club soda

1. In a blender or food processor, combine the flours, sugar (if using), salt, eggs, milk, and butter. Process until smooth. Pour the batter into a bowl, cover with plastic wrap, and refrigerate for at least half an hour, or overnight.

2. Remove the bowl from the refrigerator and gently whisk the seltzer water into the batter.

3. Place a large skillet over medium high heat and spray with non-stick oil. Pour 2 tablespoons of batter into the skillet. Tilt and rotate the pan, spreading the batter all over the bottom of the skillet. Cook for about 30 seconds, or until the bottom side of the crepe is golden. Flip the crepe by lifting the edge of the crepe with a fork and using your fingers to grasp and turn it. Cook another 20 seconds, or until golden.

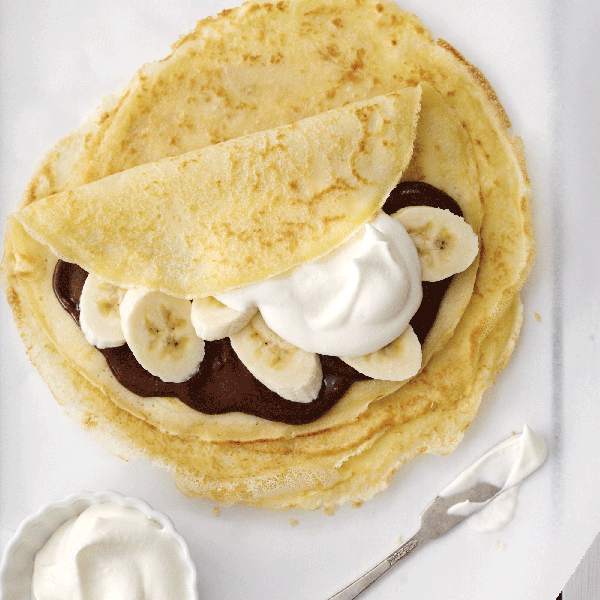
4. Fill and serve the crepe, or continue making crepes until all the batter is used.

Choosing Tart Over Pie

I know this is a trivial matter to some people. If your choosing pie over tart it's fine with me but hey why not like both? I mean pies have it's own sets of unique features and also tart. A tart is a baked dish consisting of a filling over a pastry base with an open top not covered with pastry. The pastry is usually shortcrust pastry; the filling may be sweet or savoury, though modern tarts are usually fruit-based, sometimes with custard. Tartlet refers to a miniature tart. Examples of tarts include jam tarts, which may be different colours depending on the flavour of the jam used to fill them, and the Bakewell tart.

The categories of 'tart', 'flan', and 'pie' overlap, with no sharp distinctions, though 'pie' is the more common term in the United States. The French word tarte can be translated to mean either pie or tart, as both are mainly the same with the exception of a pie usually covering the filling in pastry, while flans and tarts leave it open. The Italian crostata recipe, dating to at least the mid-1400s, has been described as a "rustic free-form version of an open fruit tart". Early medieval tarts generally had meat fillings, but later ones were often based on fruit and custard.


Ingredients

10" uncooked pie shell
5 tart apples
1 cup pastry cream (crème patissiere), cooled
2 tablespoons unsalted butter, melted
1 tablespoon granulated sugar
For the pastry cream:
4 egg yolks
½ cup granulated sugar
1/3 cup + 1 tablespoon all purpose flour
2 cups milk
½ vanilla bean, cut in half lengthwise

1. Begin by making the pastry cream; in a large mixing bowl, whisk together the egg yolks and sugar. Whisk in the flour. Set aside.
2. In a large saucepan placed over high heat, pour the milk and vanilla. As soon as the mixture begins boiling, remove the pan from the stove. Remove the vanilla bean. Scrape out the seeds from the bean and pour them into the milk.
3. Whisk ½ the milk mixture into the egg mixture.
4. Place the saucepan back onto the stove over high heat. As soon as the mixture starts boiling, pour everything in the bowl into the saucepan, whisking constantly until smooth. Once the mixture starts boiling again, stir and boil for 2 minutes more.
5. Remove the pan from the stove and place some plastic wrap directly on the surface of the pastry cream; this prevents a skim from forming on the top of the cream. Cool completely.
6. Transfer the pre-made pie dough to a pie pan. Refrigerate.
7. Preheat the oven to 375 degrees F.
8. Peel, core, and thinly slice the apples.
9. Spread the pastry cream over the bottom of the pie shell. Lay the apple slices over the cream. With a pastry brush, brush the melted butter over the apples. Sprinkle with sugar.
10. Bake until golden, about 50 minutes. Remove from the oven and place on a wire rack. Carefully remove the pie from the pan and serve.

Sunday, 2 June 2013

My Nutty Bananas

Banana bread has always been a delicious way to take those old bananas and turn them into something edible so all that hard earned money doesn't go down the drain. That's all fine and good, but banana bread is highly underrated. We are talking about good banana breads here. Not only the kinds that are edible but kinds that shine when they are at the table and dance in your mouth. Where did it all get lost in translation that banana bread is a way to get rid of old bananas? A good banana bread makes the flavor of banana something incredible. It had to start somewhere though. We can only guess that it begun in hard times. Let us take a look.

First we must say that bananas have been around for a very long time. Bananas have always been hanging off their trees. Bananas were discovered in India. The Greeks themselves knew about them in the 4th century BC where the army of Alexander the Great discovered them in India. There were banana fritters for Napoleon in his last days, but bananas were still very rare in those days, because they were so very hard to export because transport was so slow and bananas can definitely rot if brought to that point. In the 1830s, bananas were seen in certain New York market places, in 1870, Cook brought bananas into the Boston harbor, but it wasn't until the invention of refrigeration that people really started buying bananas. Then all sorts of things like banana boats and banana dishes were brought about to support the new found love of the commercial banana. It was 1880, whenrecipes really started showing up in cookbooks. Lots of easy cooking videos are available in your finger tip.


To make a moist and rich tasting banana bread the secret is buttermilk. Combining ripe bananas and buttermilk create a loaf of bread that is as good as dessert. With some milk enjoy this for breakfast or serve it as a dessert coated with cream cheese frosting. This banana nut bread with buttermilk recipe is moist and crunchy, sweet and buttery. It has a scrumptious crumb and its moist interior is quite unforgettable. With coffee or tea this also goes so perfectly well.

Ingredients
4 tablespoon butter
3/4 cup granulated sugar
1 1/2 cups bananas, mashed
2 large eggs, well beaten
1 teaspoon vanilla extract
2 cup flour
1 teaspoon baking soda
3/4 teaspoon salt
1/2 cup buttermilk
3/4 cup walnuts, chopped

1. Mix butter and sugar in a bowl until smooth. Add bananas, eggs and vanilla. Beat well.
2. Mix the flour, baking soda, and salt in a separate bowl.
3. Add this to the banana mixture. Then slowly add buttermilk. Mix thoroughly to get an even paste. Then fold in the chopped nuts.
4. Pour batter into greased baking tray. Bake it for about 60-90 minutes in a preheated oven at 275 degree F. It’s done and ready to be served.